1. Assign products to BackOrder list
To allow selling products even when they run out of stock, you’ll need to first assign the products you want to the BackOrder products list.
There are 3 ways for you to assign products to this list.
- BackOrder inventory tracking
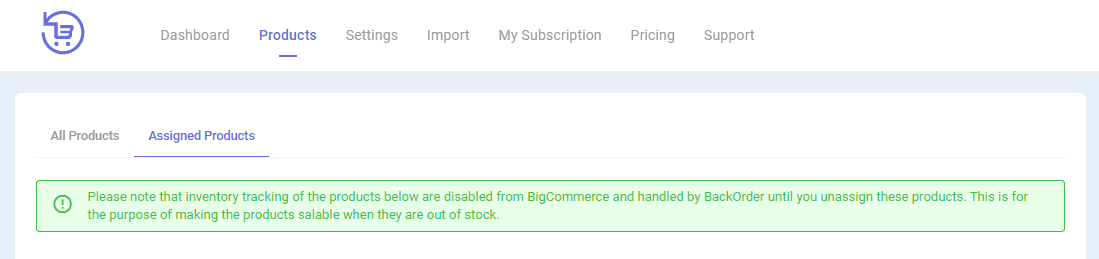
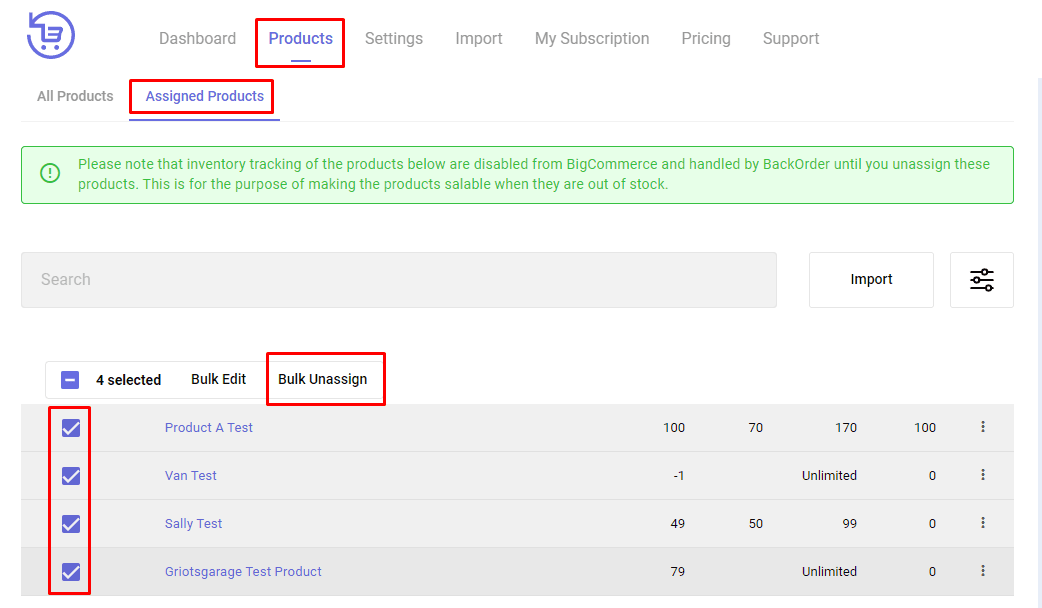
Once a product is assigned to the BackOrder products list, BackOrder will keep track of its inventory, instead of BigCommerce. That means the inventory tracking status on BigCommerce will be turned off during this time. See the notice here:
- BackOrder on product level
Based on the default logic of BigCommerce, the assignment of BackOrder will be done on product level.
- BackOrder products management
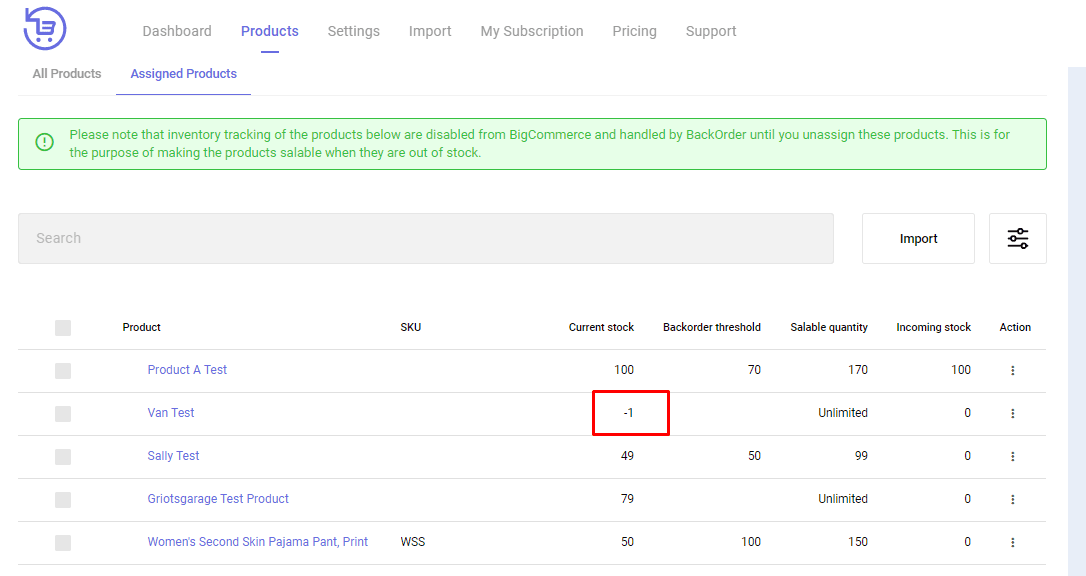
Once a customer places a BackOrder for a product with qty = 1, the current stock on the Products page will be shown with a negative number qty = -1.
- Inventory update for assigned products
Once you receive more supplies of products or simply just want to update the current inventory, you can update the new stock through one of these 4 ways:
- Via ERP or a 3rd-party inventory management system
- Via Import file to BigCommerce
- By the Edit function under “Assigned products tab” on BackOrder (section 2.1 and 2.2)
- Via Import file to BackOrder (section 2.3)
Once you finish updating the inventory, you’ll see the products’ inventory synchronized seamlessly and in real-time to the BackOrder.
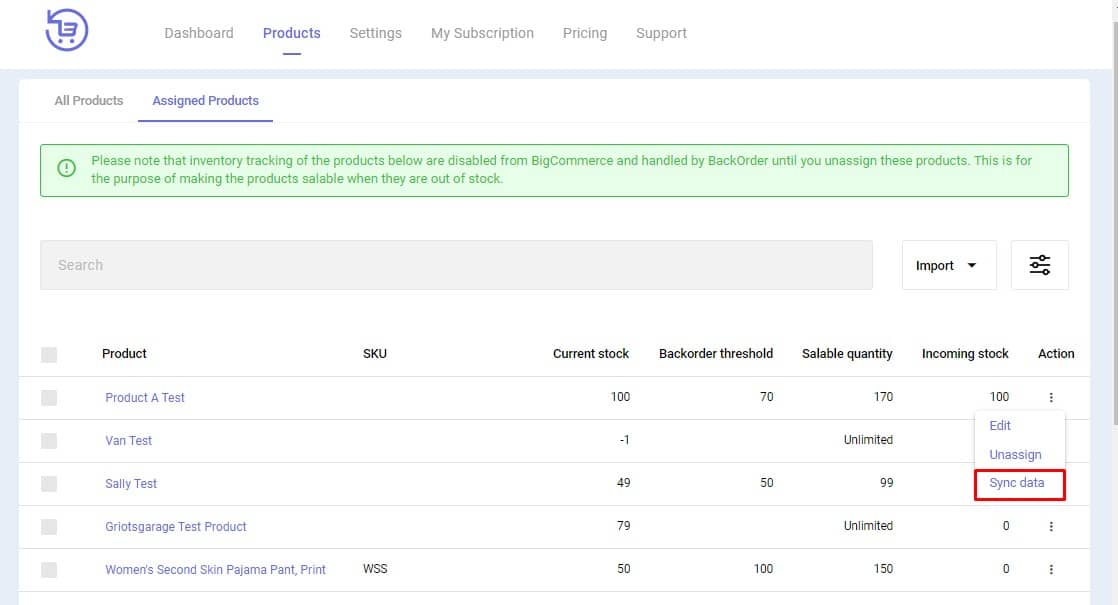
- Manual synchronize inventory
Products in the BackOrder list always keep their inventory data synchronized properly, however, to ensure this, you can also do the manual sync for inventory data here:
1.1. Assign products one by one
Step 1: Go to the Products tab, you’ll see 2 sub-tabs All Products and Assigned Products
- All Products: list down all products pulled from BigCommerce catalog
- Assigned Products: list down all products which have been assigned to BackOrder, in other words, this is the BackOrder products list.
Step 2: Go to the All products tab first, you’ll see the list of all products pulled from the BigCommerce catalog and other products’ details
- Search bar and Filters: you can search for specific products and filter products in the list based on Visibility, Availability and Assigned status.
- Product, SKU, Visibility, Availability and Current stock: the original products’ details pulled from BigCommerce catalog.
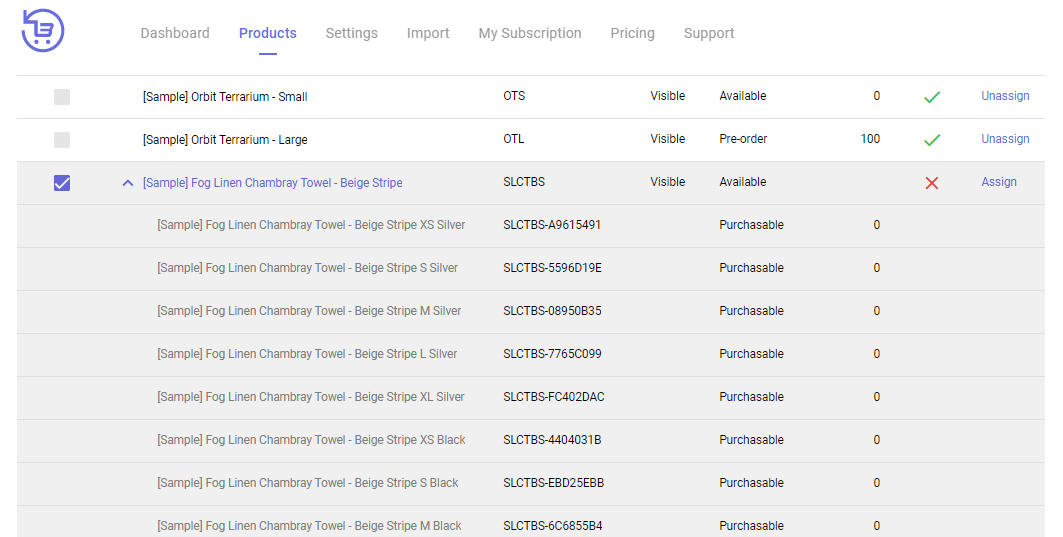
- Assigned to BackOrder: status of a product whether it’s assigned to the BackOrder products list or not.
- Action: includes Assign and Unassign. You use Assign to assign a specific product to the BackOrder product list and Unassign to unassign it from the list.
Step 3: You click the Search bar and search for product you want > then click Assign label on the same row
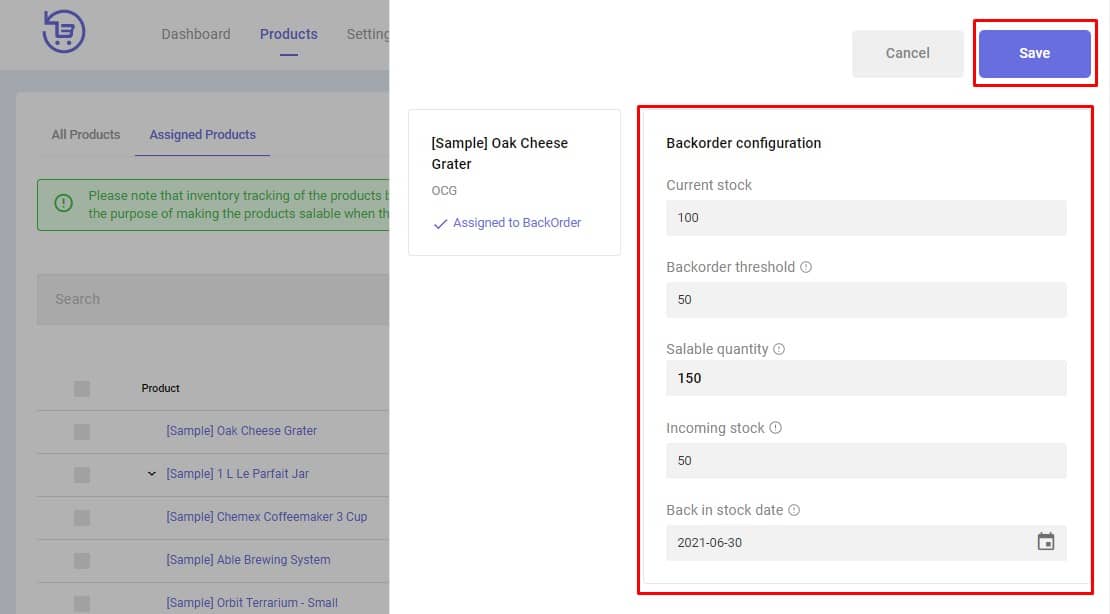
Step 4: A BackOrder Configuration pop-up will be displayed for you to input BackOrder product’s details > Input the information you want > Save 
- Current stock: the original current stock of products that you have
- BackOrder threshold: the maximum number of BackOrder products that customers can place on your website
- Salable qty: the maximum number of products that can be purchased from your website which is calculated automatically and equal to the total number of Current stock and BackOrder threshold.
- Incoming stock: the number of items that will be back in stock on a specific date
- Back-in-stock date: the specific date when the incoming stock is received and added to the current stock.
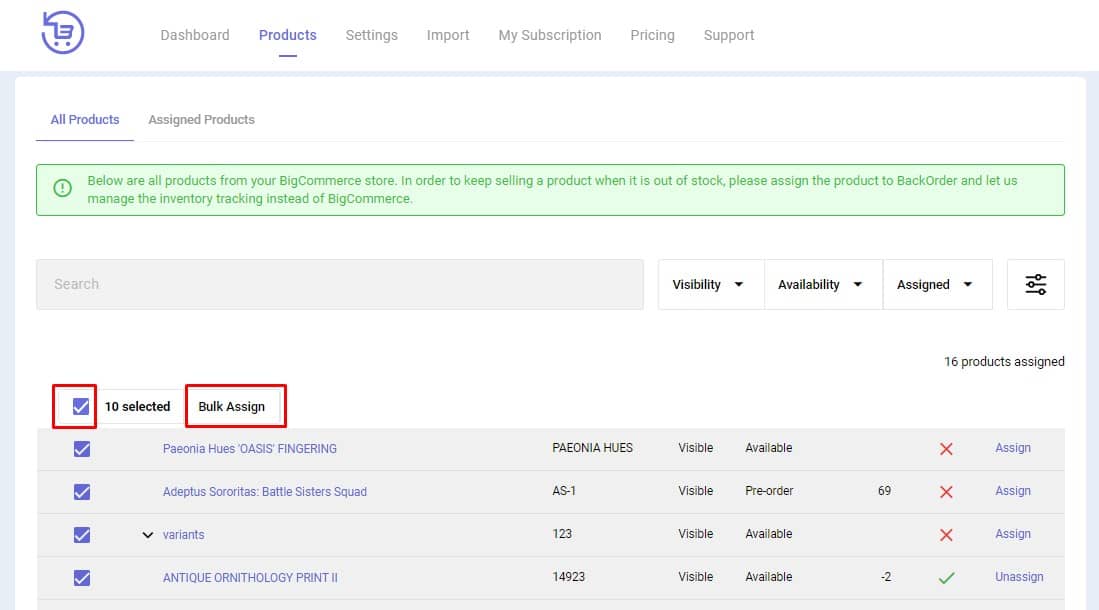
Step 1: Go to the Products tab, you’ll see 2 sub-tabs All Products and Assigned Products
Step 2: Go to the All products tab, you’ll see the list of all products pulled from the BigCommerce catalog and other products’ details.
Step 3: Select multiple products by clicking the checkboxes > click Bulk Assign button to assign all/some products to BackOrder list in bulk
Step 4: You’ll be redirected to the Bulk Assign page > input product’s inventory and assign products per your want > Click Save

Before importing, make sure that the products must not be assigned to the BackOrder products list previously.
Step 1: Go to Assigned Products tab > Under Import dropdown, select Import to assign more products to BackOrder option
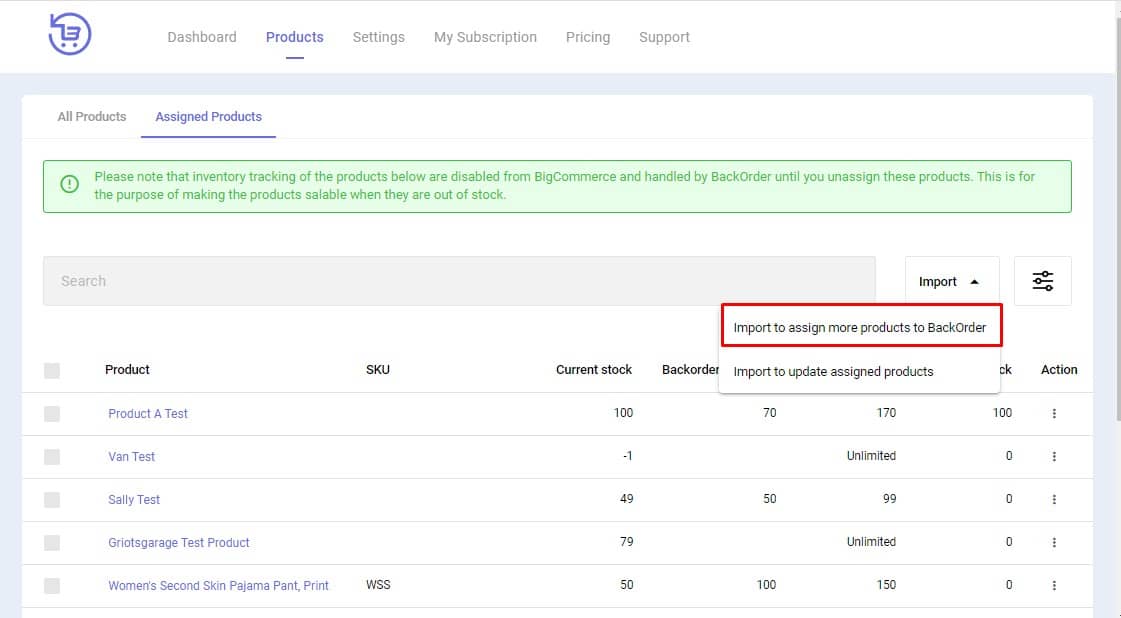
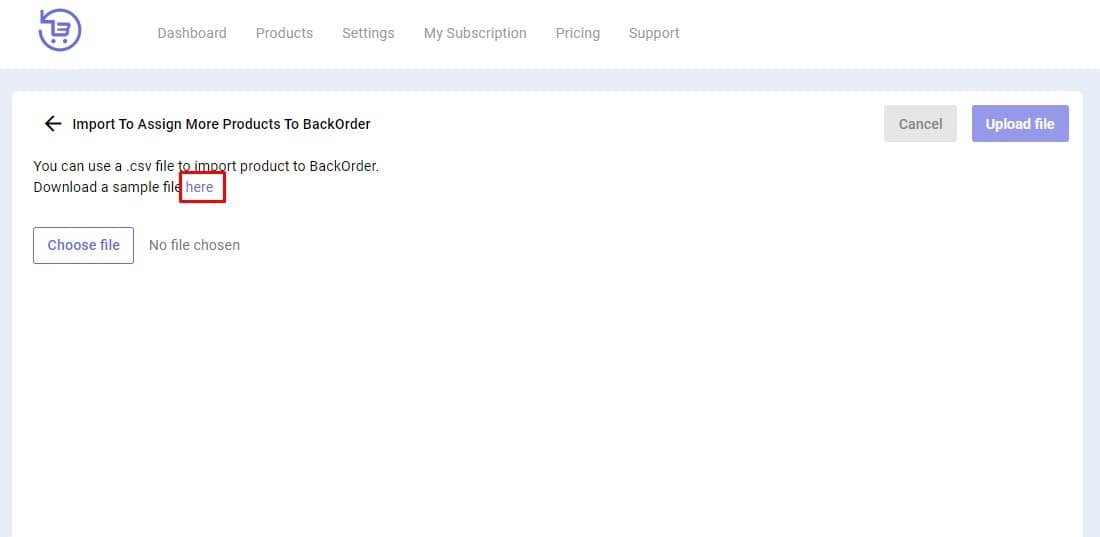
Step 2: You’ll be redirected to the page to choose your import file
Step 3: Input inventory data for the products you want to assign in the CSV file as below
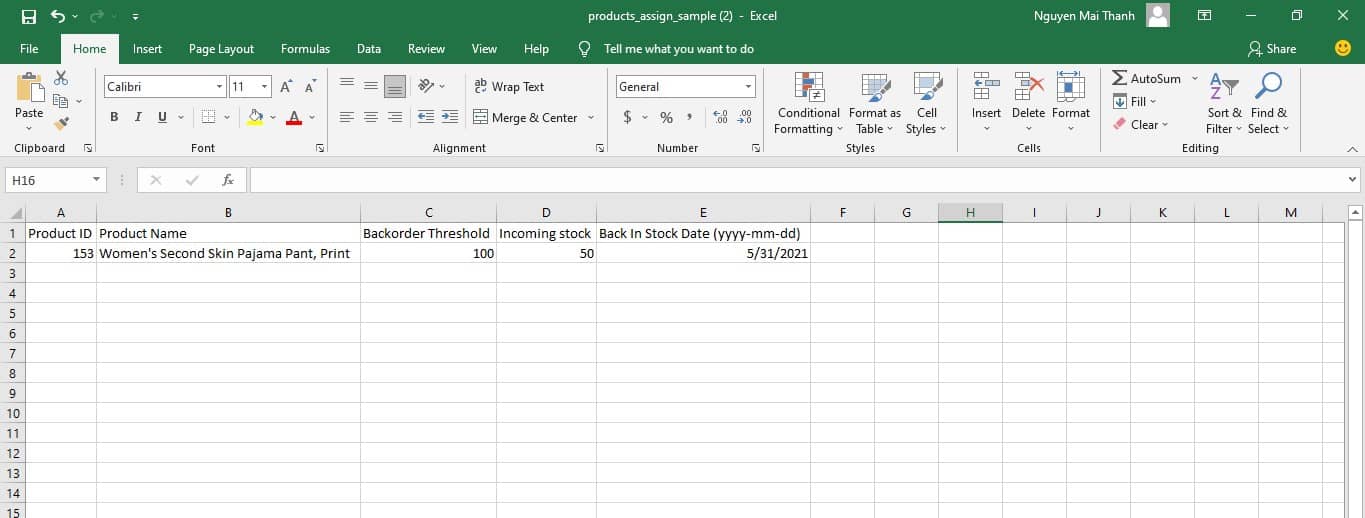
NOTE:
- Product ID: should be collected from the BigCommerce export file
- Back in stock date: must be in the right format
Step 4: Back to the Import page, you just need to click Choose file > Select the file you’ve prepared > Click Upload file > Finish
Toggle Title
Toggle Content
2. Edit products on BackOrder
When you receive more supplies of products or just simply want to adjust the products’ details, there are also 3 ways for you to edit a product’s inventory in the BackOrder:
Step 1: Go to Products tab > Assigned Products > You click the Search bar and search for the product you want to edit.
Step 2: Under Action column, click Edit
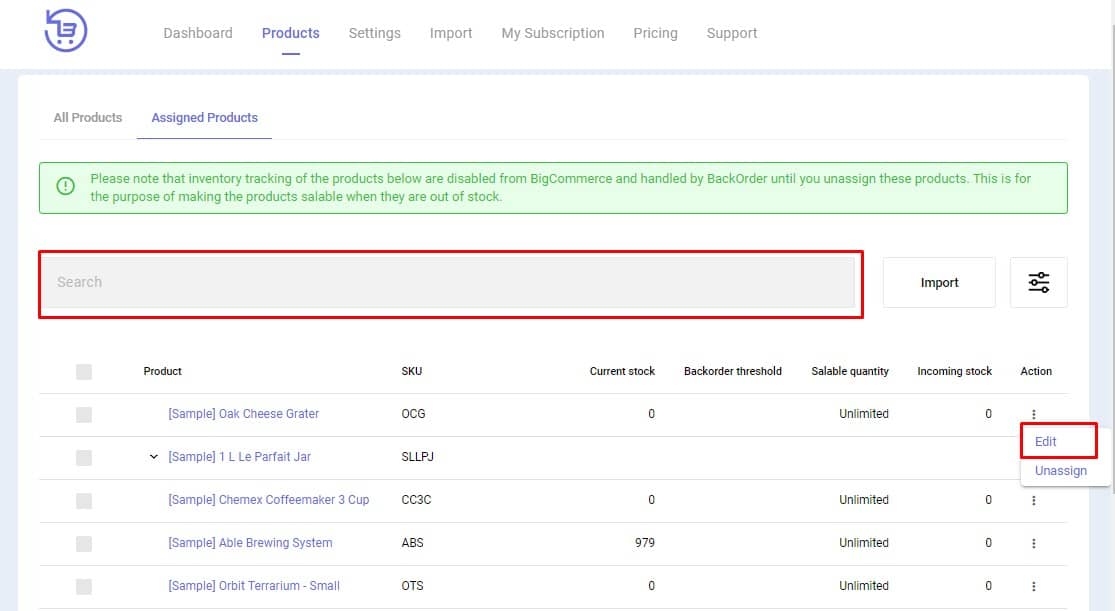
Step 3: A BackOrder Configuration pop-up will be displayed > you can edit the product’s information here > click Save.
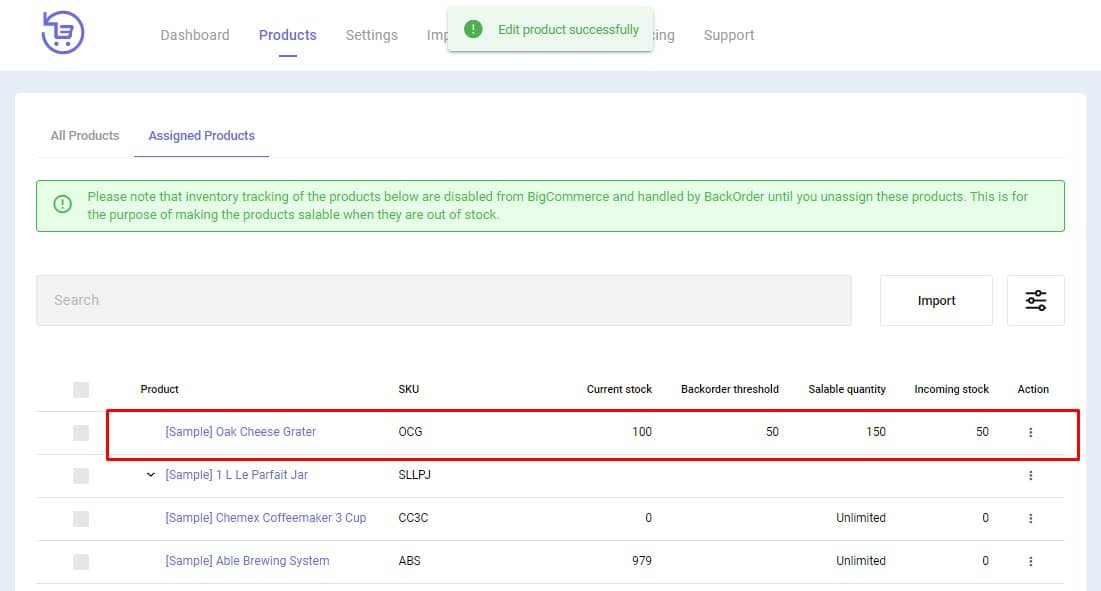
The new products’ data will be edited and displayed properly on the Assigned Products page.
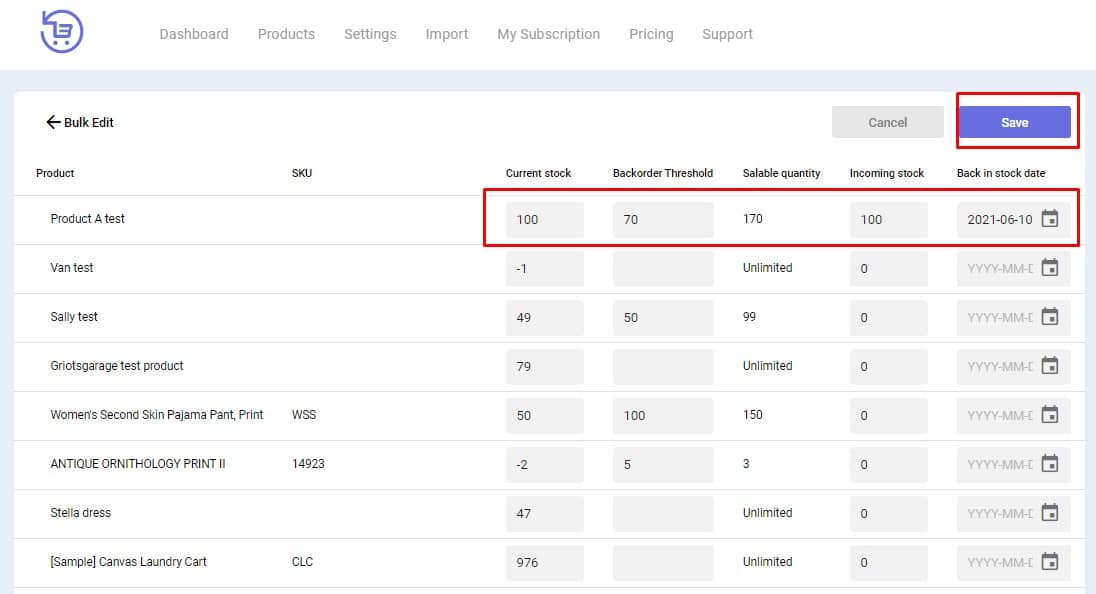
Step 1: Go to the Assigned Products tab > select multiple products by clicking the checkboxes > Click Bulk Edit button to edit all/some products in mass
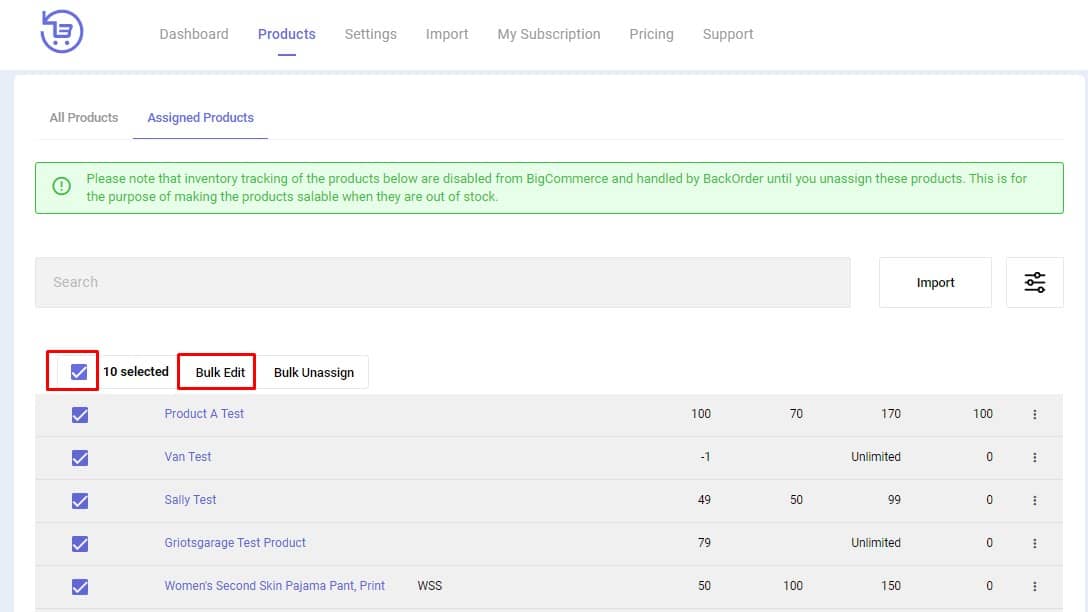
Step 2: You’ll be redirected to the Bulk Edit page > edit the product’s inventory per your want > Click Save
Step 1: Go to Assigned Products tab > Under Import dropdown, select Import to update assigned products option.
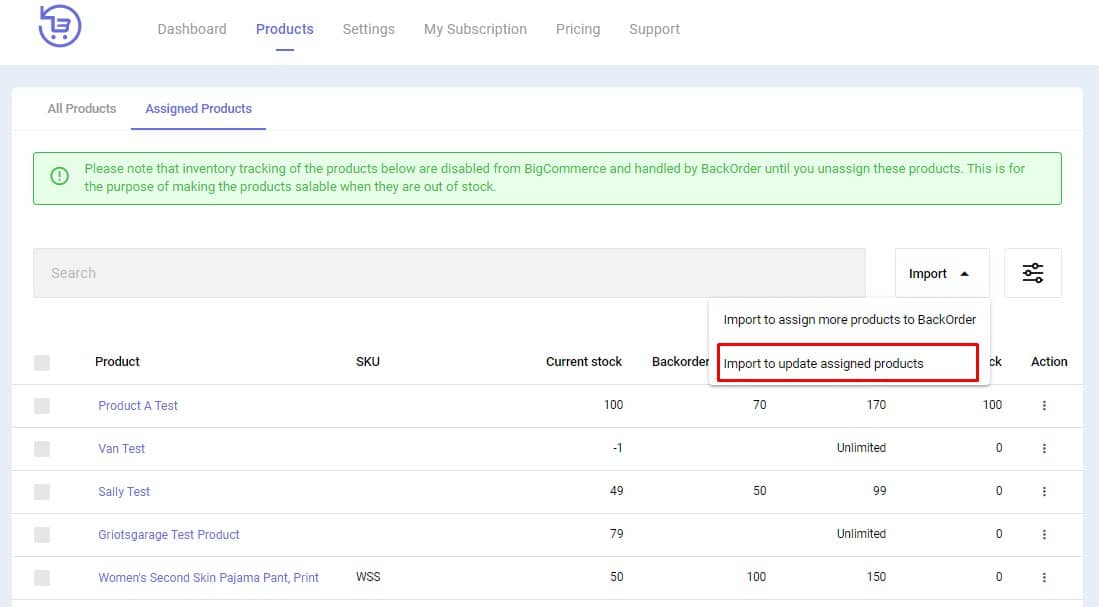
Step 2: You’ll be redirected to the page to choose your import file
Step 3: Input inventory data for the products you want to assign in the CSV file as below:
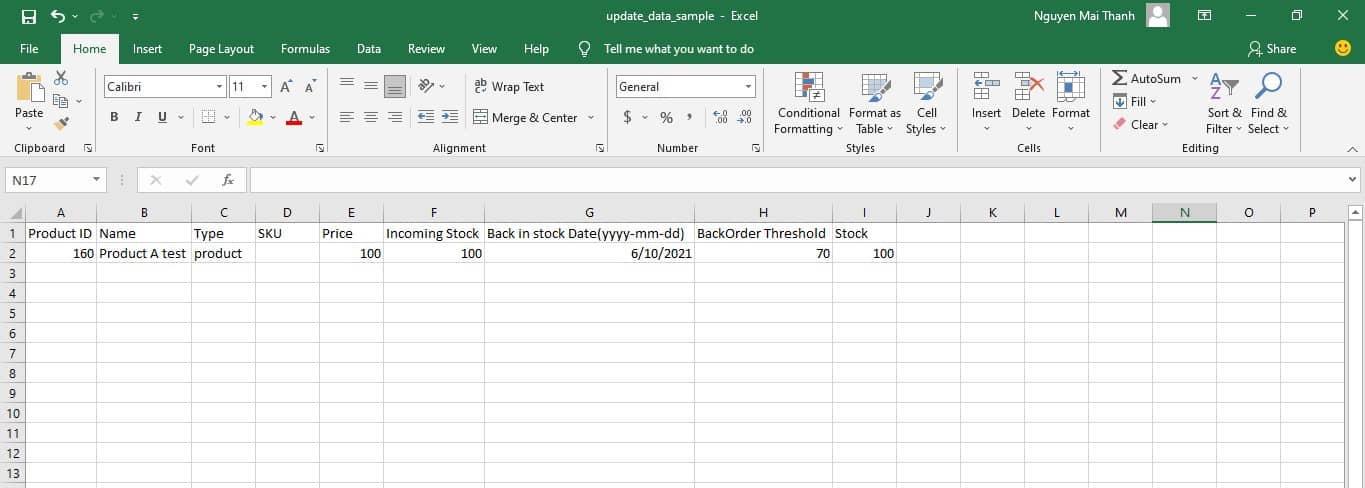
NOTE:
- Product ID: should be collected from the BigCommerce export file
- Back in stock date: must be in the right format
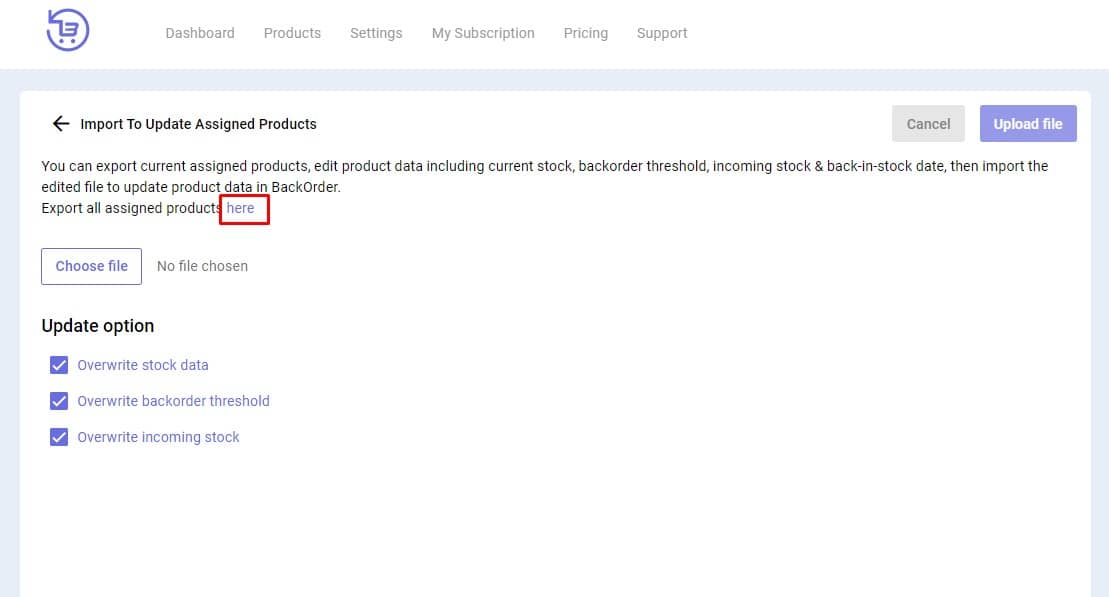
Step 4: Back to the Import page, you just need to click Choose file > Select the file you’ve prepared > Click Upload file > Finish
You can click the checkboxes to overwrite data before importing.
3. Setting
Theme is a crucial part of setting up your BackOrder as it will affect the storefront setting later. To avoid any unexpected behavior or wrong message on your storefront, please select the correct theme that is currently used for your store in our theme collection.
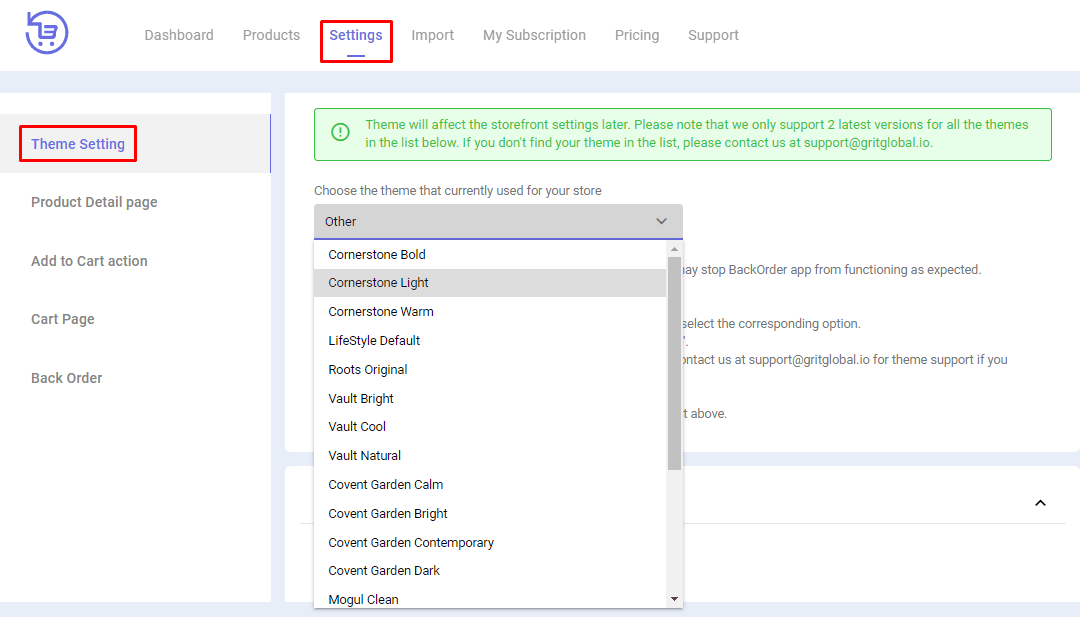
NOTE:
- A mismatched theme selection may stop BackOrder app from functioning as expected.
- If you are using a custom version of any theme in the list, please select the corresponding option.
- If you don’t find your theme in the list, please select option “Other“.
- In these cases, BackOrder may not work as expected. So please contact us at [email protected] for theme support if you encounter any problems.
- We only support the 2 latest versions for all the themes in the list above.
As a store owner, you can customize the backorder description via storefront setting. Please note that all the description settings are optional and customizable. If you do not want to show a certain description on your storefront, simply delete the text inside that field.
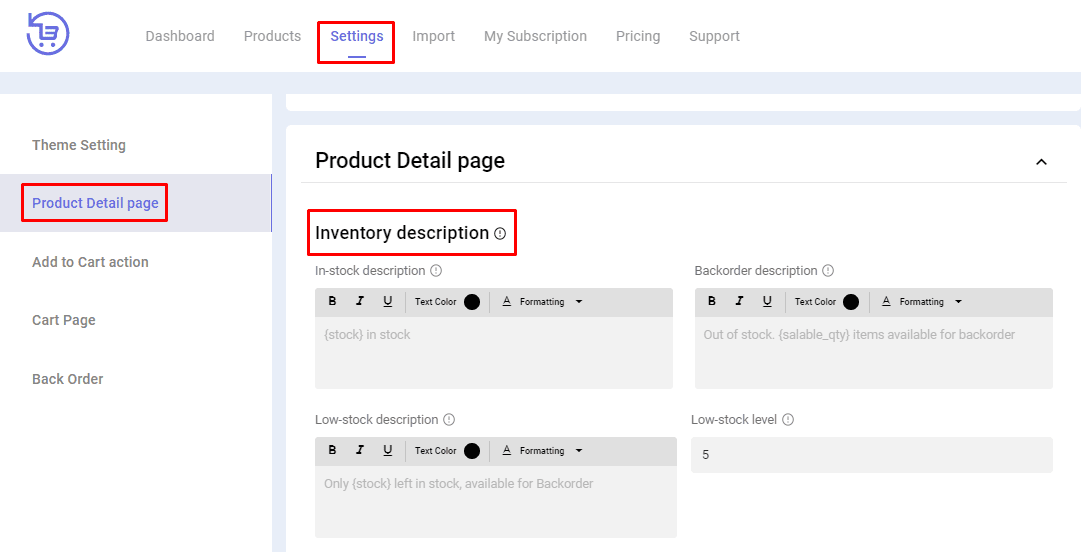
4.2.1. Inventory Description
Inventory Description includes:
- In-stock description: This message will be displayed on Product Detail page when the product is in stock. Use {stock} to call out the current stock of the product.
- Low-stock level: When product inventory level drops below this low-stock level, the low-stock description will be displayed on the Product Detail page.
- Low-stock description: This message will be displayed on Product Detail page when the inventory reaches the low-stock level.
- Backorder description: This message will be displayed on Product Detail page when the product is out of stock.
- Use {threshold} to call out the backorder threshold of the product.
- Use {salable_qty} to call out the maximum number of items that customers can add to cart.
- In case the backorder threshold or salable quantity is unlimited, we will not return value for the variable.
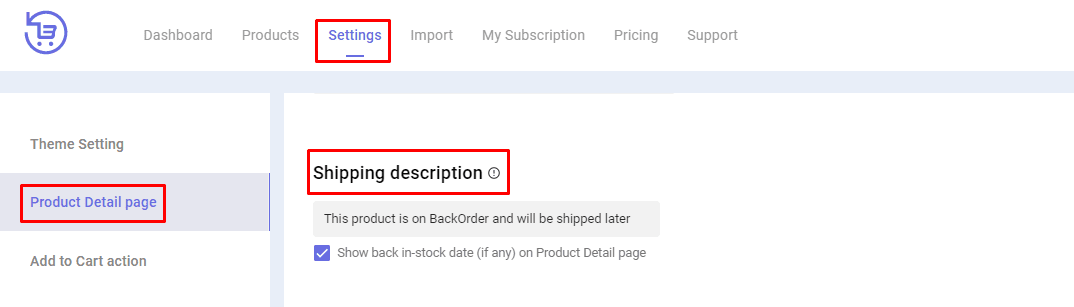
4.2.2. Shipping Description
Shipping Description will be displayed under the Add to Cart button when the product is out of stock and available for backorder.
If you want to show back-in-stock date (if any) on Product Detail page, simply tick the box right below.
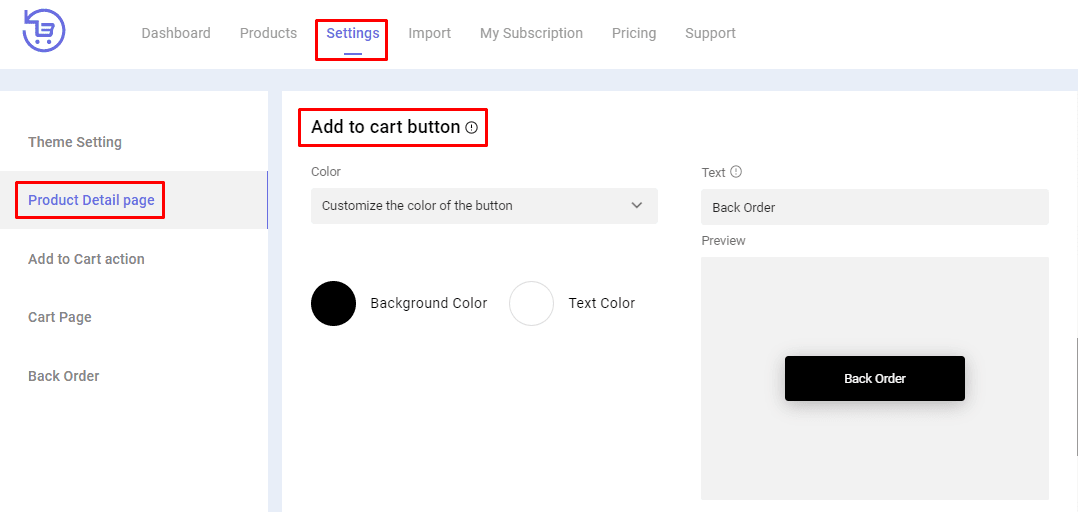
4.2.3. Add To Cart Button
When the product is out of stock and available for backorder, you can customize the “Add to cart” button with the text and color of your choice.
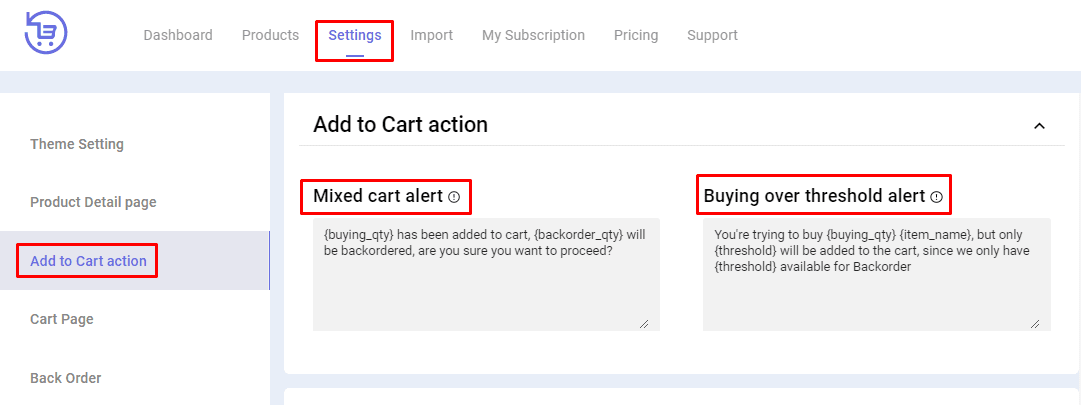
The BackOrder app has 2 messages that can be shown to your customers when they click add to cart with backorder items.
- Mixed Cart Alert: This pop-up message will be displayed right after users click on “Add to cart” button if the purchased quantity is greater than the current stock of the product. It will let users know the total items added to cart and how many of which are on backorder.
- Buying Over Threshold Alert: This message will be displayed when users try to buy more than salable quantity. Please note that when threshold runs out, the product will be automatically disabled on your storefront.
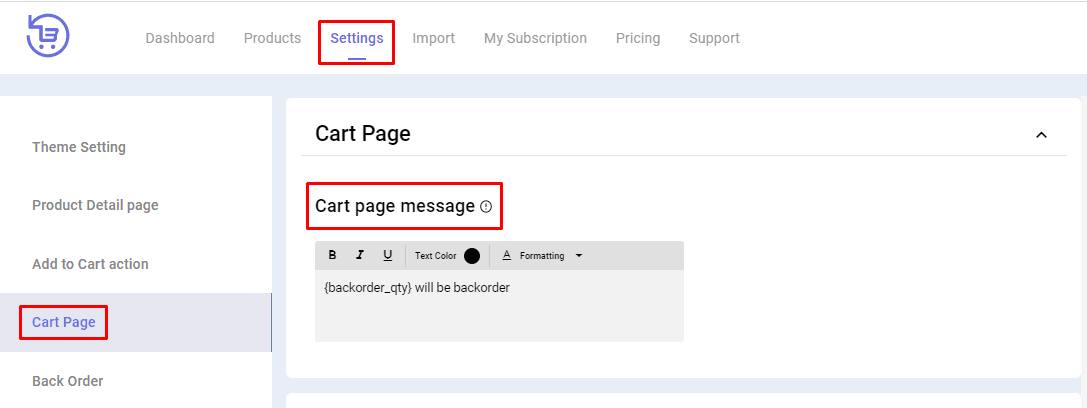
The Cart Page message will be displayed on the Cart page to alert customers that the product is being backordered.

The BackOrder message will be displayed on the note of the backorder along with the products being backordered.
4. Unassign products from BackOrder list
Unassign products can be used when you need to assign new products to allow automatic backorder instead. Please note that once a product is unassigned, the app will no longer take over its inventory tracking and your customer can not buy more than what’s in stock.
To unassign a product from BackOrder:
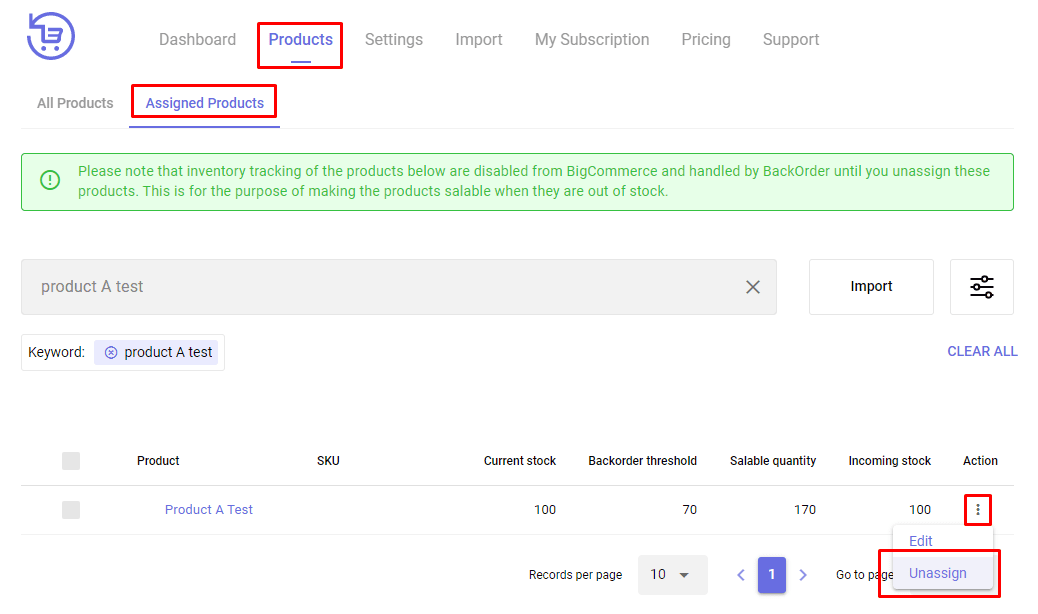
Step 1: Go to the Products page > Under the Assigned Products tab, search for the product you want to unassign.
Step 2: Click on the Action box to unassign the product.
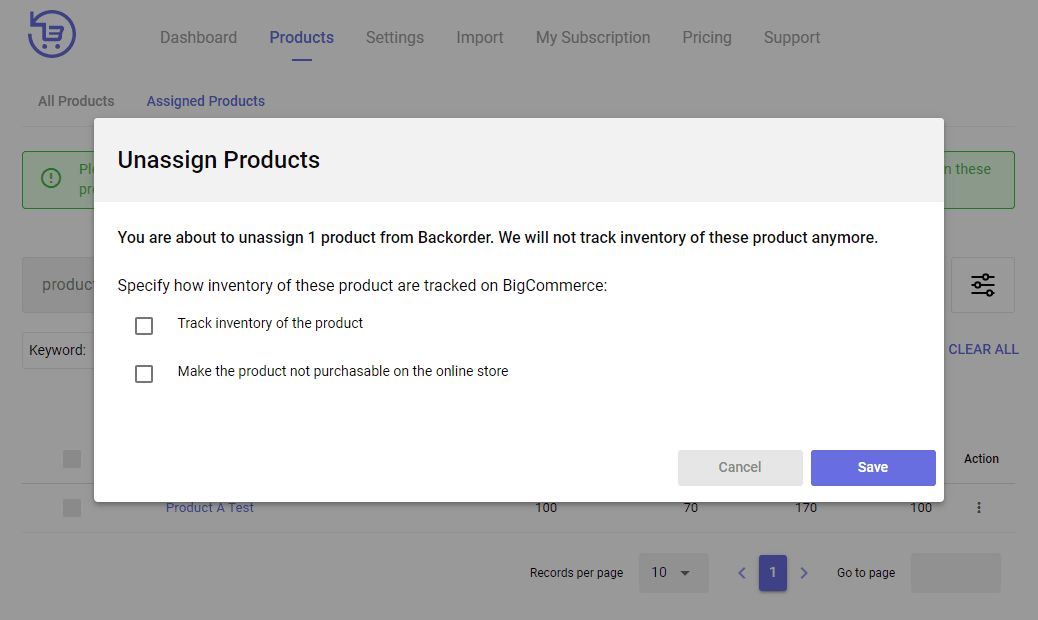
NOTE:
- A pop-up message will show up when you click on the Unassign action as the app will no longer control the product inventory. Please note that this is an optional field. You are not required to:
(1) Track inventory of the product – let BigCommerce track inventory of the product.
(2) Make the product not purchasable on the online store – disable the product on your online store.
- That product can be re-assign to BackOrder anytime if needed.
To unassign multiple products at one time:
Step 1: Under the Assigned Products tab, select all the products that you want to take off BackOrder.
Step 2: Click on Bulk Unassign action to remove those products from the app in one go.
NOTE: A pop-up message will show up when you click on the Unassign action as the app will no longer control the product inventory. Please note that this is an optional field. You are not required to:
(1) Track inventory of the product – let BigCommerce track inventory of the product.
(2) Make the product not purchasable on the online store – disable the product on your online store.
5. BackOrder Report
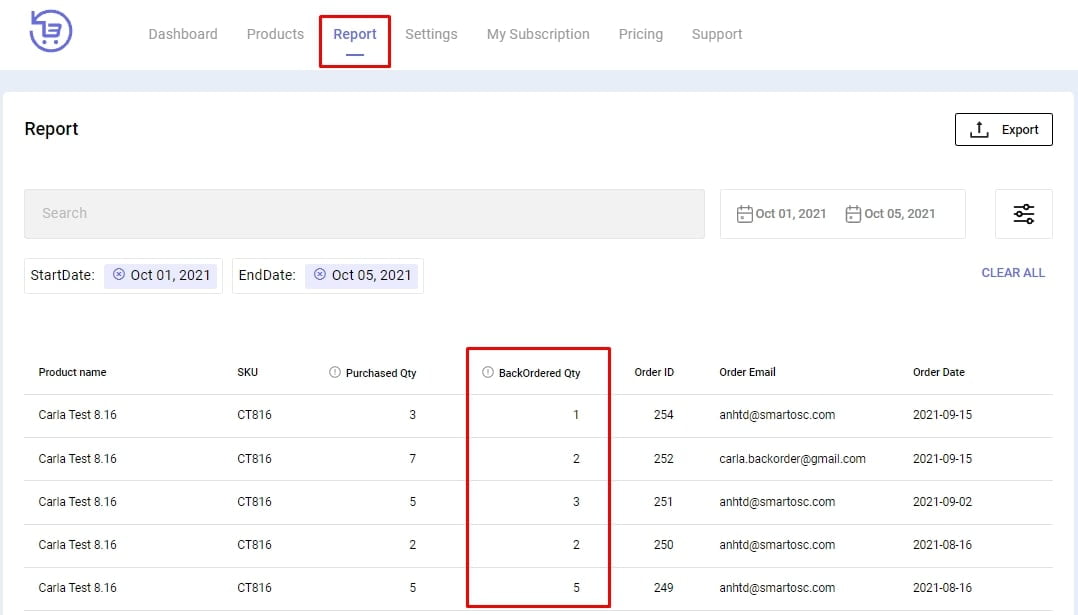
With BackOrder report, you’re able to view all of the back-orders at the product level – meaning that if the order includes 2 backordered products, it will be displayed as 2 different records in the table, includes the following information:
- Product name: Name of the product
- Product SKU: SKU of the product
- Purchased quantity: Total purchased quantity of the product in the order.
- BackOrdered quantity: Total backordered quantity of the product in the order.
- Order ID: ID of the order
- Order email: Email of the customer who placed the order
- Order date: Order date displayed according to the time zone of the store
You can easily keep track of all backordered items by:
- Searching for product name/ product SKU
- Filtering by order created date/ product category/ product brand.
6. Frequently Asked Questions
How does the app work?
To put it simply, BackOrder allows your store to continue selling products after the quantity reaches zero. To make a product purchasable when it is out of stock, you need to assign that product to BackOrder.
What happens when a product is assigned to BackOrder?
When a product is assigned to BackOrder, inventory tracking of that product will be disabled in BigCommerce. This’s for the purpose of making the product purchasable when it is out of stock.
If inventory tracking of assigned products is disabled in BigCommerce, how can I manage inventory of these products?
Depends on where you manage your product inventory. Please refer to Inventory Management section below.
What happens when I enable inventory tracking of a product in BigCommerce?
When a product is assigned to BackOrder, its inventory tracking is disabled.
After that, if you enable inventory tracking of that product on BigCommerce, the product will be unassigned from BackOrder (which means it will not purchasable when out of stock anymore).
How will my customer be aware that a product is being backordered?
You can customize your storefront to alert your customers that the product is being backordered. Storefront customization can be found under Setting tab.
1. You can customize the inventory description displayed on the Product Details page.
2. You can add a shipping description under Add to Cart button to let customer know that the product will be shipped later.
3. You can change the “Add to Cart” button with the text and color of your choice.
4. You can add a message to Cart page to alert customer about the delay in shipping as the product is backordered.
I don’t see the storefront customization for backordered products work properly. Anything wrong with it?
Your theme might not be supported yet. Please email us at [email protected] and we will figure this out.
5.2.1. If you manage product inventory in BigCommerce:
How can I manage inventory for assigned products?
There’re multiple ways to manage inventory for assigned products:
1. Manage product inventory in BigCommerce:
You can update product inventory in BigCommerce using Import function. Those updates will be synchronized properly to BackOrder.
2. Manage product inventory in BackOrder:
- You can update inventory for a single product by simply editing that product in BackOrder.
- You can also update inventory for multiple products at once by using “Bulk Update” or “Import” function.
When there’s an inventory update in BackOrder, will those updates be synchronized to BigCommerce?
No. Inventory will be synchronized from BigCommerce to BackOrder whenever there’s an update in BigCommerce, not vice versa.
5.2.2. If you manage product inventory in IMS/ ERP:
Our inventory is currently managed by IMS/ERP. How will BackOrder, BigCommerce, and our IMS /ERP system work with each other?
Your IMS/ERP is still the single source of truth when it comes to inventory management.
Any updates from your IMS/ERP to BigCommerce will also be synchronized properly to BackOrder. Below is how it works:
1. Inventory’s updated in IMS/ ERP
2. Those updates are synchronized to BigCommerce through the integration between your
IMS/ ERP and BigCommerce
3. BigCommerce fires a webhook for any inventory update
4. We capture those webhooks and update to BackOrder
What happens when I update inventory level of a product in our IMS/ERP?
As long as the update is synchronized to BigCommerce, it will also be synchronized to BackOrder.
When there’s an inventory update in BackOrder, will those updates be synchronized to our IMS/ ERP?
No. Inventory will be synchronized from IMS/ ERP to BackOrder, not vice versa.
When a product is assigned to BackOrder, inventory tracking will be disabled in BigCommerce. Is it possible to update inventory from IMS/ ERP to BigCommerce then? Where the data will be stored?
Data can still be updated from your IMS/ ERP to BigCommerce even when inventory tracking is disabled.
Although you cannot see it in the control panel, it’s stored in BigCommerce database and we get it through API calls.
Is there a limit on the number of products that can be assigned to BackOrder?
The number of products that can be assigned to BackOrder is limited according to your subscription plan. We provide 4 plans so that you can choose the one most suitable for your business.
How will I be charged?
We offer a free plan forever with 1 assigned product. If you need to assign more products to keep selling when they are out of stock, please select a paid plan.
You will be charged a subscription fee corresponding to your selected plan for each billing cycle.
How do upgrades and downgrades affect my billing?
When you upgrade, you will be immediately charged a prorated amount for the partial billing cycle period that you are going to be using the new plan. Also, the number of assigned products will be expanded to you immediately.
When you downgrade, you will retain your old plan until the end of your billing cycle. At that point, you will be moved to the new plan.